
.svg)

- Webflow CMS Collections streamline dynamic content management.
- Plan content structures with Reference & Multi-Reference fields.
- Automate updates with Zapier, the Webflow API and external apps.
- Optimise CMS for performance & SEO-friendly structures.
- Avoid common pitfalls like overcomplicated collections & slow-loading pages.
Introduction: Why Webflow CMS is a Game-Changer for Content Management
Running a blog, portfolio, or e-commerce site can mean regular content updates. Doing that manually, page by page, is not scalable. That’s where Webflow CMS comes in.
Webflow CMS makes managing and scaling content simple—no coding required. Whether you're publishing blog posts or product listings, CMS Collections let you structure and automate your content effectively.
This guide walks you through setting up Webflow CMS Collections, so your content stays organised, scalable, and easy to manage.
1. What Are Webflow CMS Collections?
A CMS Collection is a structured database for storing and displaying dynamic content. Think of it like a spreadsheet: rows are content items, and columns are fields.

Examples of CMS Collections:
Here are a few ways CMS Collections can be used:
- Blog Posts – Each post has a title, author, date, featured image, and content.
- Projects or Case Studies – Each project includes a name, description, images, and related tags.
- Testimonials – You store client names, their feedback, and profile images.
- Products – Every product has a name, price, images, category, and stock.
Once created, Webflow can generate dynamic pages automatically for each item, helping you scale faster.
2. Planning Your CMS Collections for Scalability
Jumping in without a plan? That’s a quick way to build a messy CMS. Here’s how to future-proof it:
Step 1: Identify the Content You Need to Manage
Ask yourself:
- What type of content will I be adding regularly? (e.g., blogs, products, team members)
- Will I need different categories for my content? (e.g., blog categories, product types)
- Do certain content pieces need to be connected? (e.g., linking blog posts to authors or testimonials to services)
Step 2: Define Collection Fields
Each CMS Collection needs fields that hold specific data. Here are some common field types:
- Plain Text – For simple titles or names.
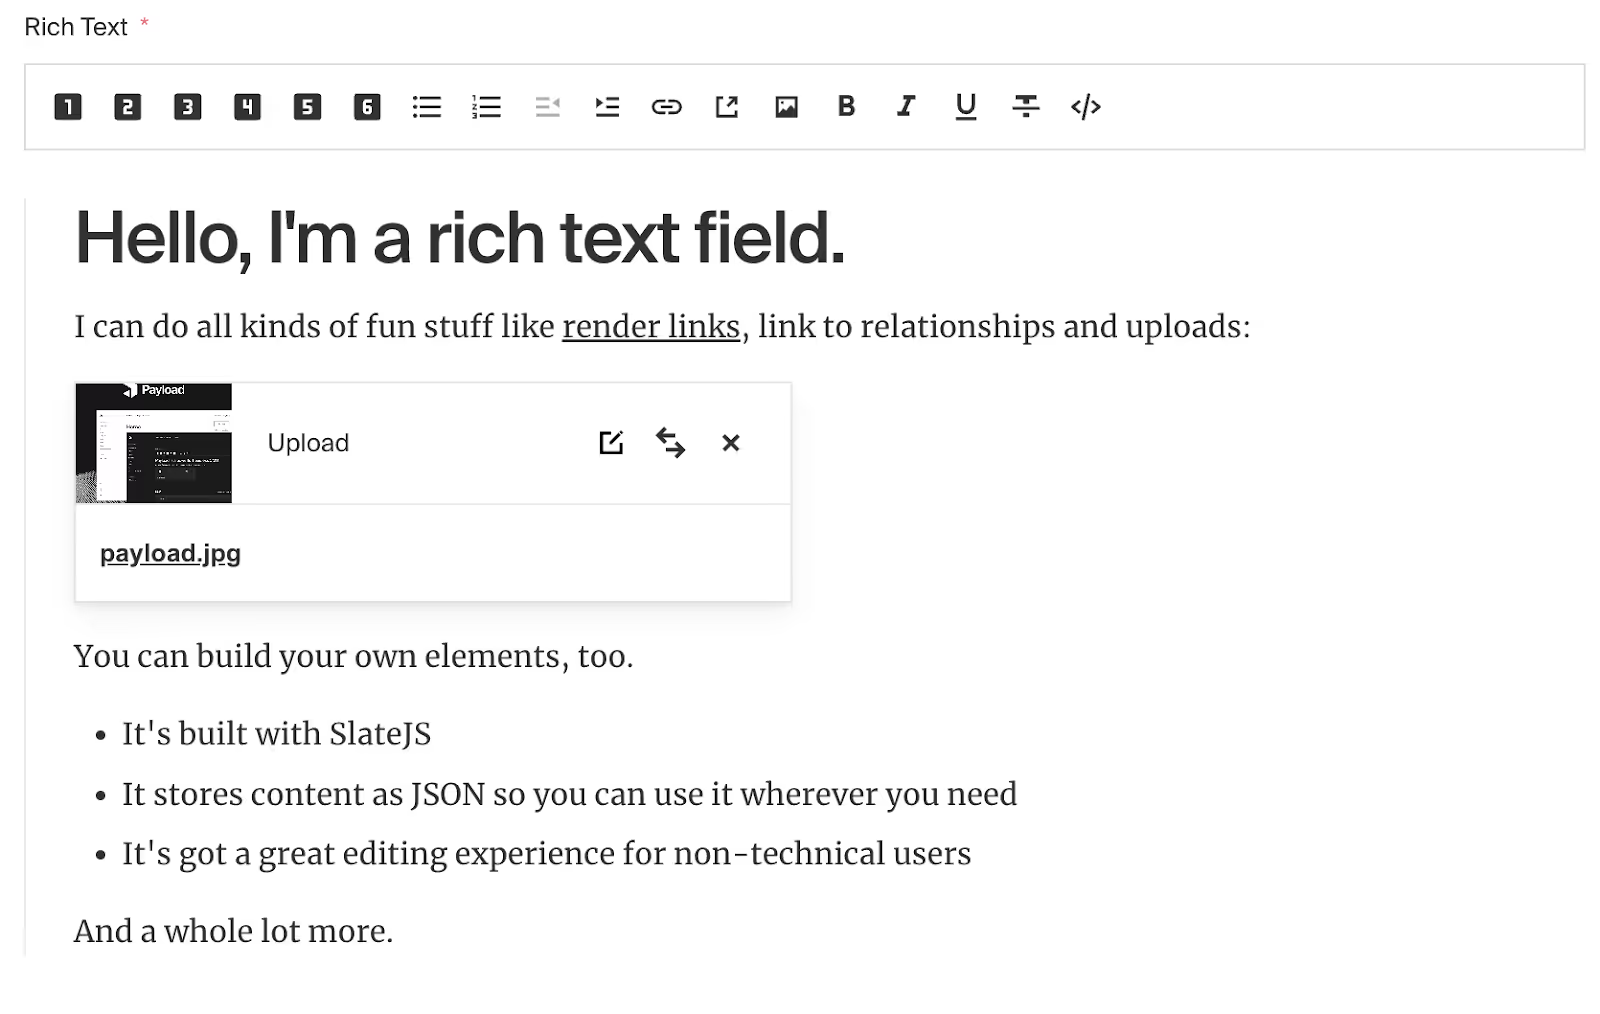
- Rich Text – For detailed content like blog posts, and where you can embed items such as images, videos or maps.
- Image – For featured images or product photos.
- Video – If you want to embed YouTube or Vimeo videos.
- Reference – To link content from one CMS Collection to another (e.g., assigning an author to a blog post).

Multi-Reference Fields – Linking Multiple Related Items Efficiently
The Multi-Reference field in Webflow CMS is a powerful but often underutilised feature. It allows you to link multiple related items within a Collection, making it ideal for content that needs many-to-many relationships.
When to Use Multi-Reference Fields
- Blog Posts & Tags – Assign multiple tags to a blog post (e.g., “Webflow,” “SEO,” “Design”).
- Authors & Blog Posts – If a blog post has multiple contributors, you can link several authors to a single post.
- Projects & Services – A project can be linked to multiple service offerings.
- Products & Features – An e-commerce product can have multiple features or benefits linked to it.
Example Use Case: Multi-Author Blog System
Let’s say your website features guest writers, and multiple authors co-write some blog posts. Instead of adding only one author per post, you can use a Multi-Reference field to assign multiple authors from the "Authors" Collection.
How to Set Up Multi-Reference Fields in Webflow:
- In the Blog Posts Collection, add a new Multi-Reference Field and connect it to the Authors Collection.
- When adding a blog post, select multiple authors from the list.
- On the Blog Post template page, use a Collection List within the post layout to dynamically display all assigned authors.
💡 Paddle Insight: Multi-Reference fields are especially useful when filtering or sorting CMS content dynamically. For example, you can create category pages that list all blog posts related to a specific tag or display all projects associated with a service.
By using Multi-Reference fields effectively, you create richer relationships between content types, improve internal linking, and enhance the user experience without manually duplicating data.
Step 3: Map Out Relationships Between Collections
If you have multiple related collections, decide how they will interact with each other.
- A blog post should be linked to an author collection.
- A case study might reference multiple services that your business offers.
- A product could belong to a category collection.
Step 4: Think About Future Growth
Even if you’re starting small, plan for expansion. Will you add new content categories later? Will you need additional fields? Setting up your CMS with scalability in mind ensures you won’t need to restructure everything later.
3. Creating a Webflow CMS Collection
Now that you’ve mapped out your content structure, let’s create your first CMS Collection in Webflow.
Step-by-Step Guide to Setting Up a CMS Collection
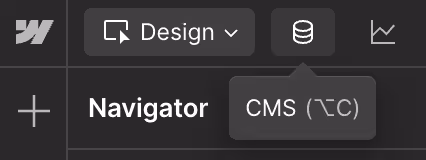
- Navigate to the CMS Panel
- Open your Webflow project.
- Click on the CMS tab in the left panel.
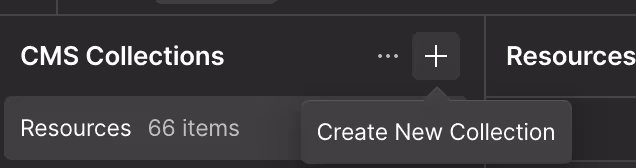
- Click Create Collection to start a new one.
- Name Your Collection
- Keep it clear and simple (e.g., “Blog Posts” for a blog, “Products” for an e-commerce store).
- Webflow automatically generates a Collection URL based on the name (e.g., /blog/), but you can customise it.
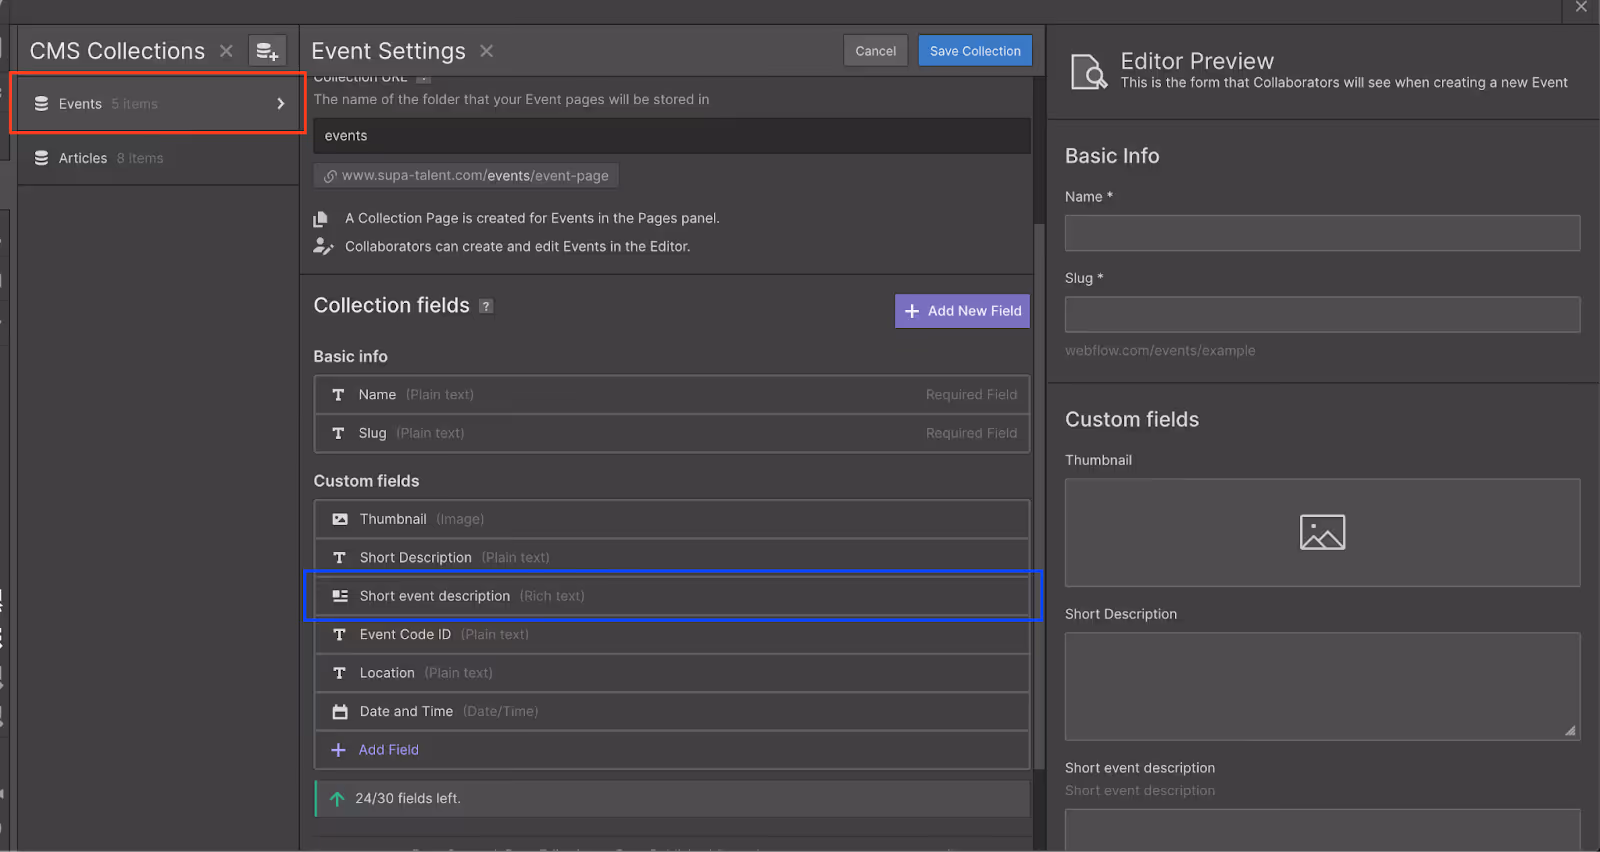
- Add Collection Fields
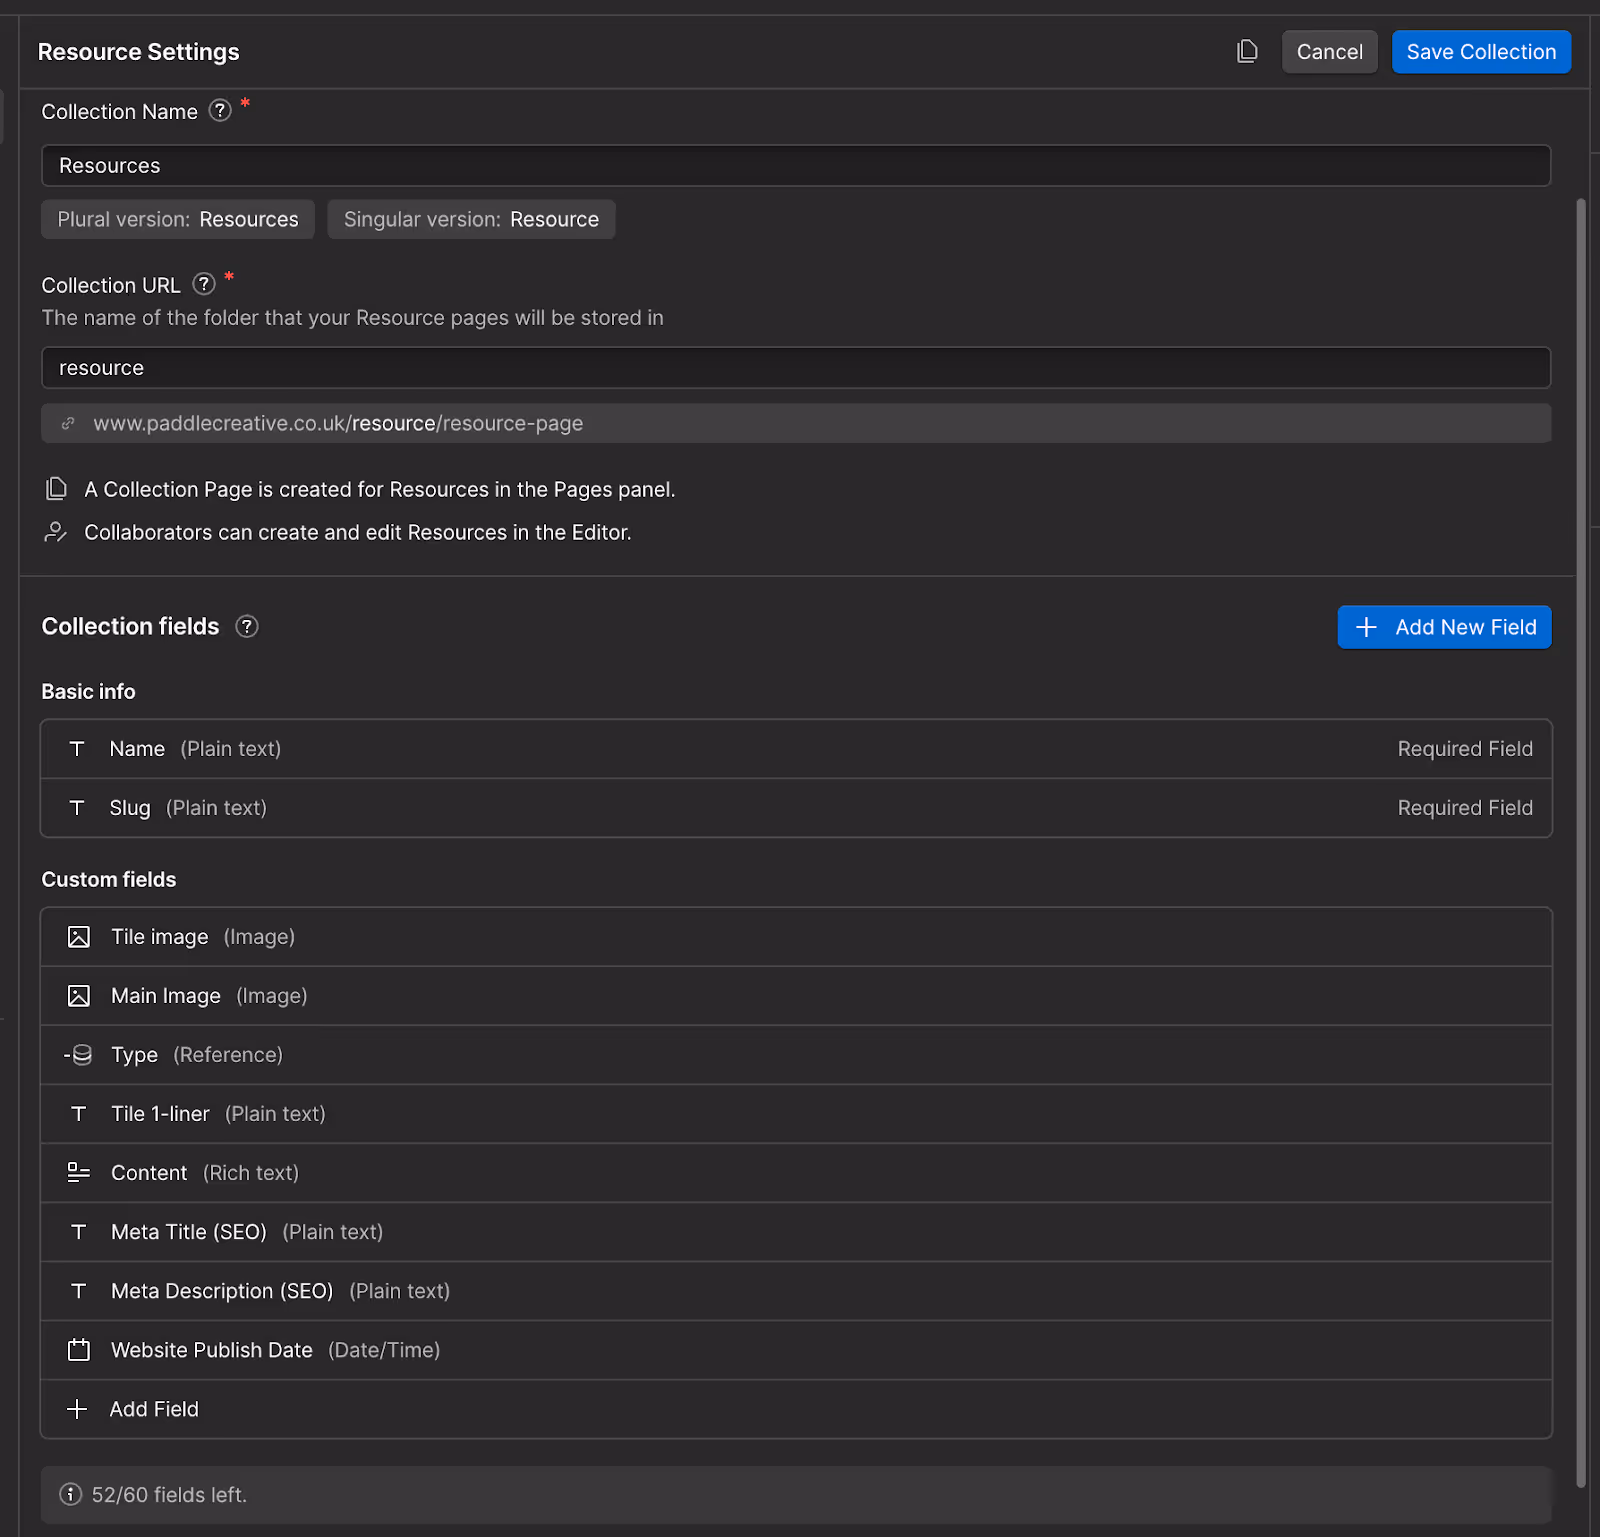
- Webflow provides predefined fields (e.g., name, slug, main image) and lets you add custom fields based on your content needs.
- Here’s an example setup for a Blog Post Collection:
- Title (Plain Text)
- Slug (Auto-generated URL)
- Featured Image (Image)
- Post Content (Rich Text)
- Category (Reference to a "Categories" Collection)
- Published Date (Date)
- Author (Reference to an "Authors" Collection)
- Set Up Reference Fields (If Needed)
- If your content needs to link to another Collection (e.g., blog posts and authors), add a Reference or Multi-Reference field.
- Example: A blog post can reference an author, so you don’t have to type the author’s name manually every time.
- Save Your Collection & Add Items
- Click Create Collection once your fields are set.
- Manually add a few sample items to test how your content looks on your site.
- You can also import content using a CSV file for bulk uploads.
Congratulations! You’ve now created your first Webflow CMS Collection. But how do you display this dynamic content on your website? Let’s move on.
Get a powerful, SEO-optimised, and automated CMS built for growth. Let’s create a system that works smarter for your brand.

4. Connecting CMS Collections to Webflow Pages
After setting up a Collection, the next step is displaying your content dynamically on your website. Webflow makes this easy using Collection Lists and Collection Pages.
1. Using Collection Lists (For Listing Multiple Items)
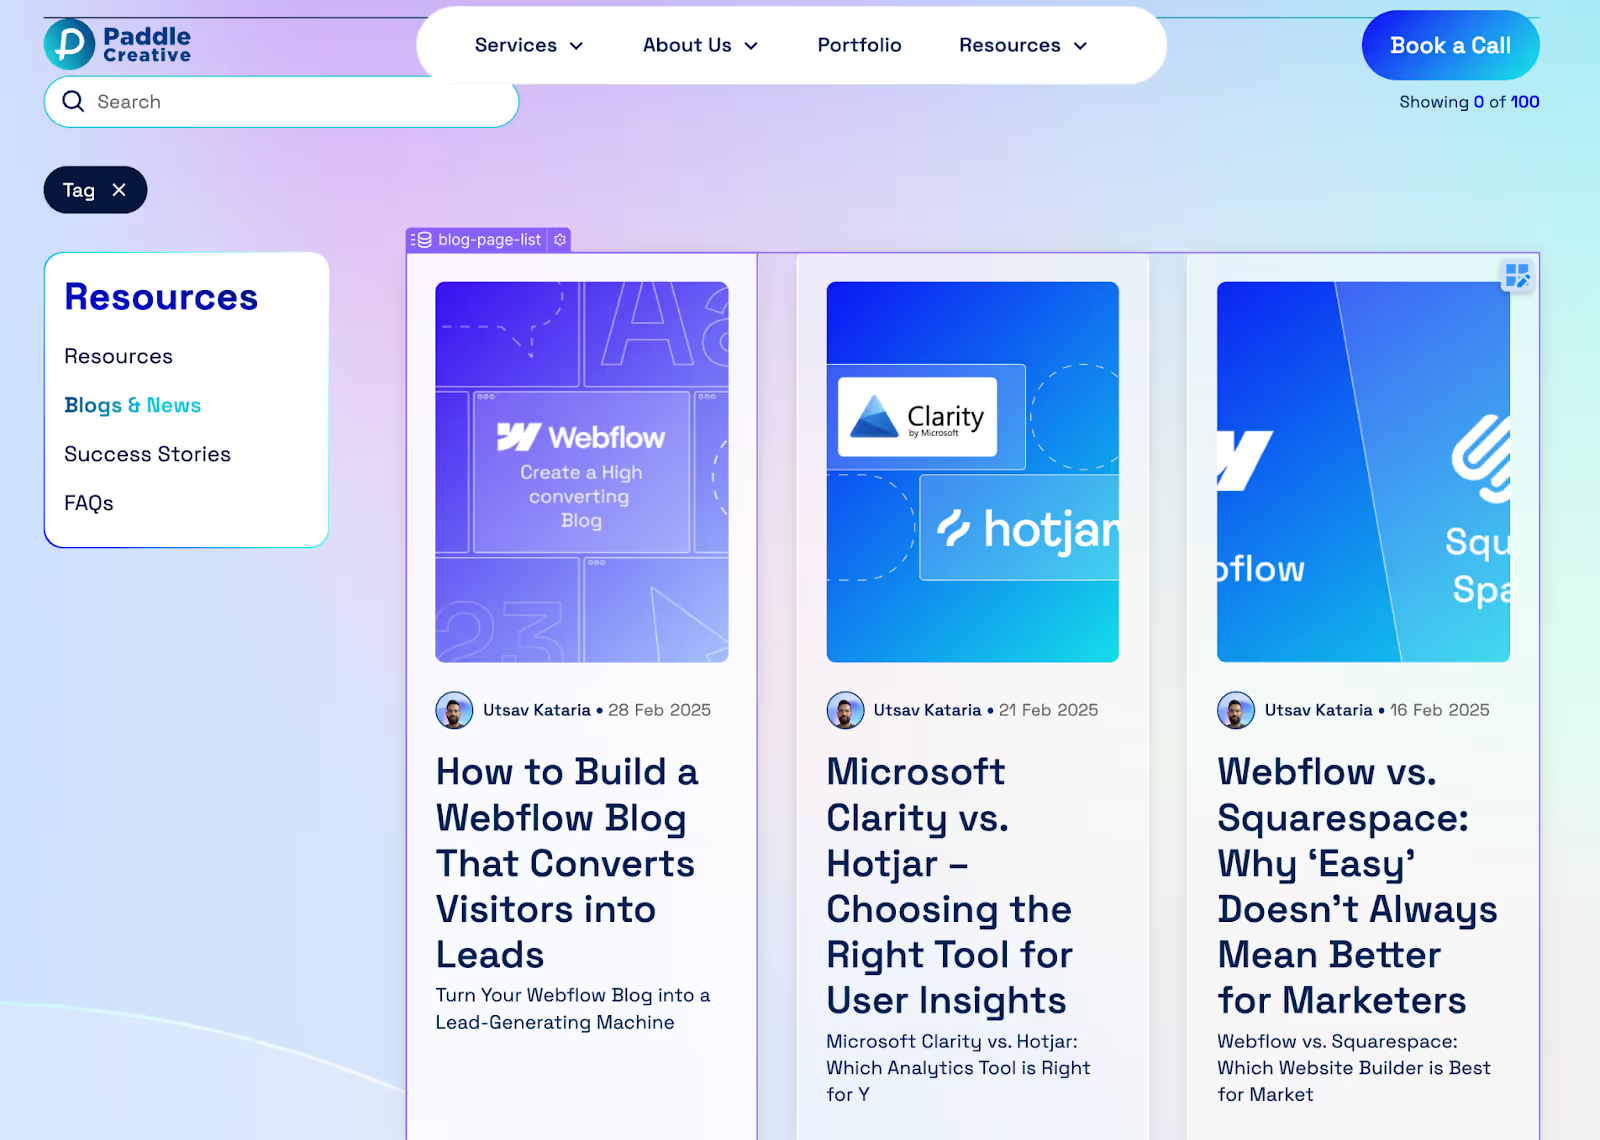
A Collection List is great for displaying multiple CMS items, such as a blog feed, a product catalogue, or a list of testimonials.
How to Add a Collection List:
- Open the Designer in Webflow.
- Drag a Collection List from the Add Panel onto your page.
- Choose the CMS Collection you want to connect (e.g., "Blog Posts").
- Webflow will automatically pull in items from that Collection.
- Customise the layout (grid, flexbox, or list) and style it using Webflow’s visual editor.
💡 Paddle Insight: Use filters to control which items appear (e.g., only showing blog posts from a specific category).
2. Using Collection Pages (For Individual CMS Items)

Webflow automatically generates Collection Pages for each CMS item. These pages work like dynamic templates, meaning you design once, and Webflow populates the content for every item in the Collection.
How to Set Up a Collection Page:
- Go to the Pages Panel in Webflow.
- Scroll to the CMS Collection Pages section.
- Click on the Collection you want to design (e.g., "Blog Posts").
- Use the Dynamic Elements feature to link fields to the page (e.g., set the Title field to display as the blog post’s title).
- Add rich text fields, images, and any other elements to structure your page.
💡 Paddle Insight: You can customise Collection Pages individually using Conditional Visibility (e.g., show a “Featured” badge only if the post is marked as featured in the CMS).
By now, you’ve successfully connected your CMS Collections to Webflow pages. But what if you need to take things to the next level with more advanced features? Let’s explore that next.
5. Advanced CMS Features for Scalability
As your content library grows, you’ll want to leverage Webflow’s more advanced CMS features to keep things efficient and scalable.
1. Reference & Multi-Reference Fields (For Connecting Data)
- Reference Fields – Link an item to another Collection (e.g., a blog post referencing an author).
- Multi-Reference Fields – Link multiple related items (e.g., a blog post linked to multiple tags or categories).
📌 Example Use Case:
A Real Estate Website might use:
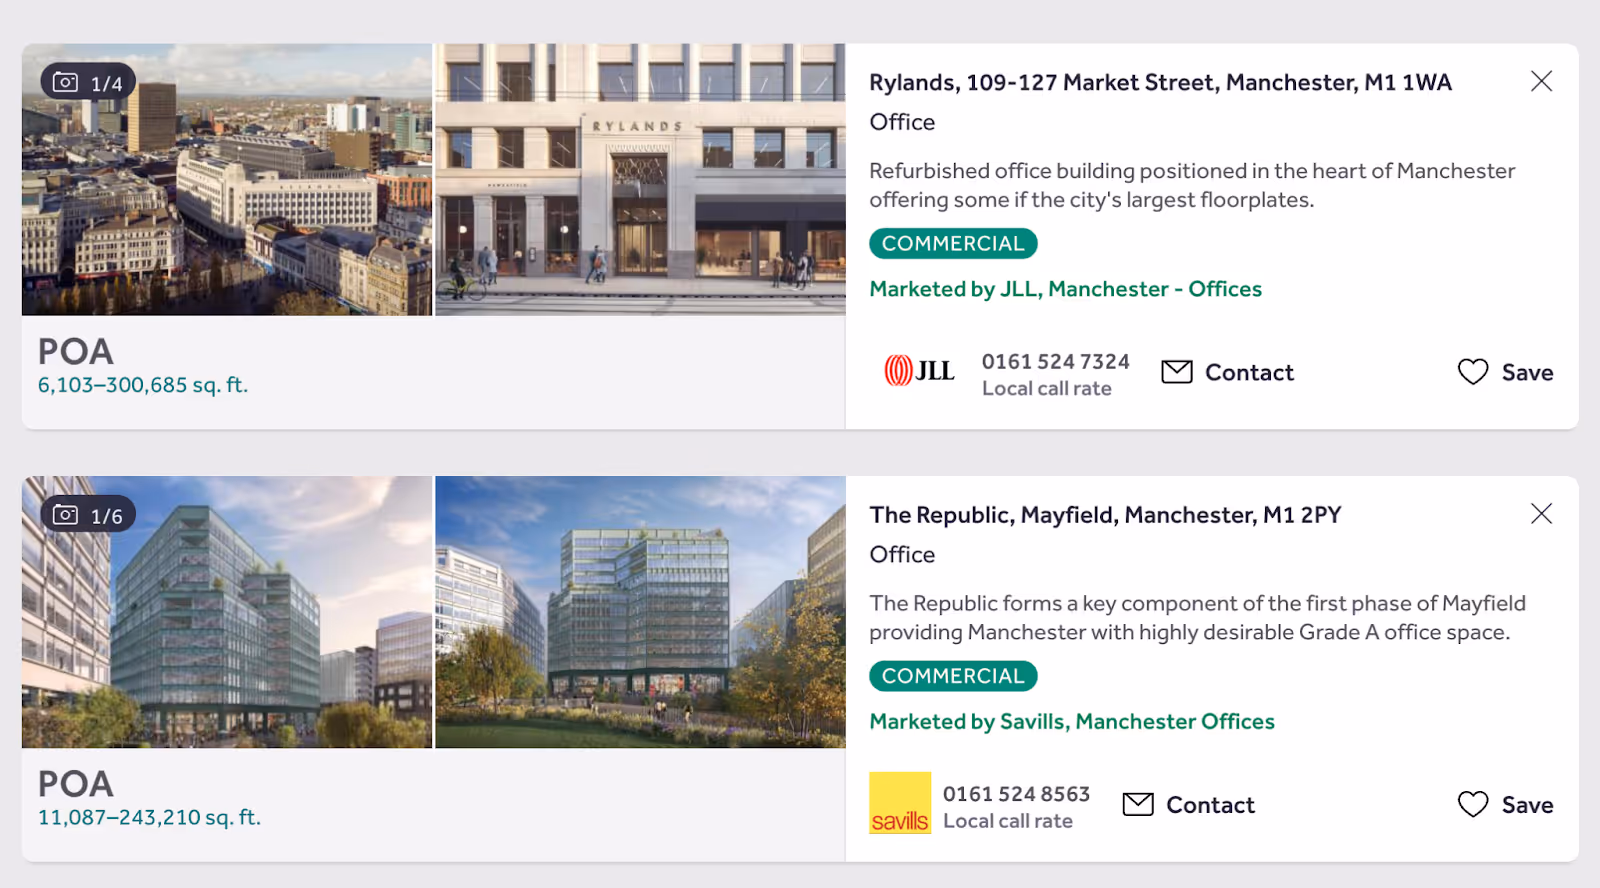
Image Source: RightMove UK
- A Property Listing Collection with reference fields for "Agent" and "Property Type".
- A Multi-Reference Field to assign multiple "Nearby Schools" to a listing.
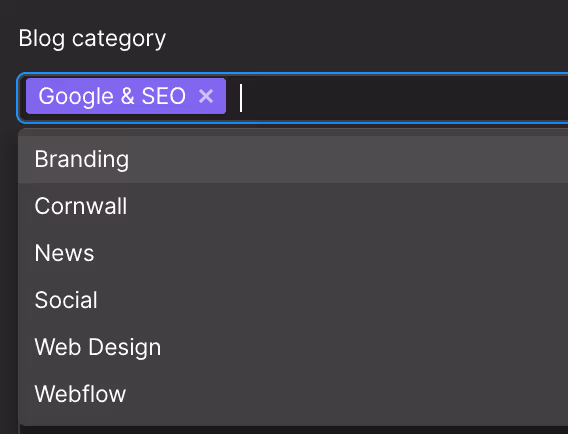
2. CMS Filters & Sorting (For Better Content Organisation)
Filters and sorting allow you to control what content appears dynamically.
- Example Filters:
- Show only blog posts published in the last 30 days.
- Display products with a "Featured" tag.
- Belonging to a specific category, “SEO” or “Webflow”
- Example Sorting:
- Sort blog posts by latest first.
- Order case studies by company name alphabetically.
3. Conditional Visibility (For Customising Display Logic)
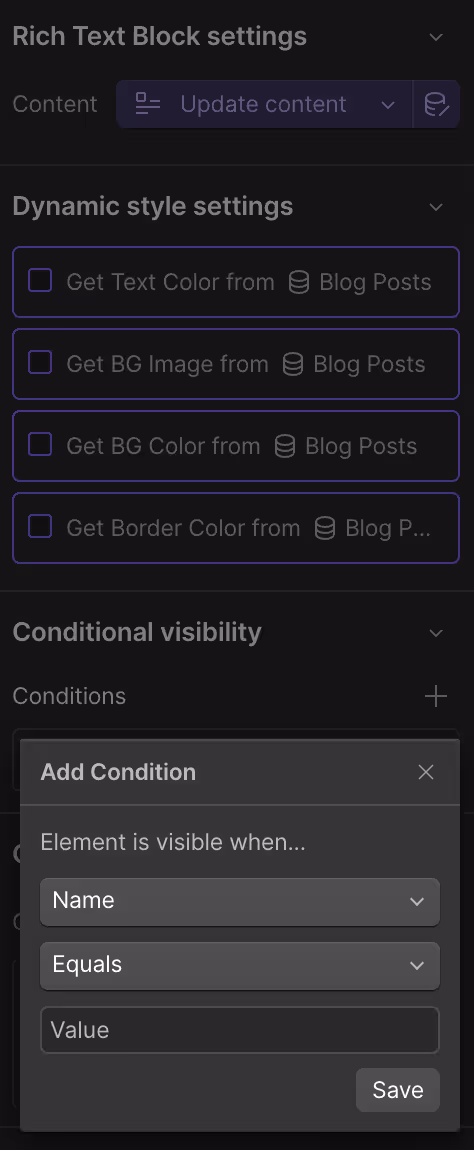
You can show or hide elements on CMS pages based on specific criteria.
- Example:
- Show a “Coming Soon” label on products that are out of stock.
- Hide the Author Bio Section if no author is assigned to a post.
4. CMS API & Automation (For Dynamic Content Updates)
If you want to automate content updates, Webflow offers integrations with tools like:
- Zapier – Automate adding new blog posts, syncing data from Google Sheets, etc.
- Make (formerly Integromat) – Connect Webflow CMS with third-party apps.
- Webflow API – For developers who want to update CMS items programmatically.
By implementing these advanced CMS features, you can make your Webflow website smarter, more scalable, and fully automated.
6. Automating Content Management in Webflow CMS
Once your Webflow CMS Collections are set up, managing content manually can become tedious, especially as your website grows. Thankfully, Webflow offers automation features to help streamline content updates, reduce manual work, and ensure a scalable content system.
1. Syncing Webflow CMS with External Apps

Webflow integrates with third-party automation tools like Zapier, Make (Integromat), and Airtable to keep content updated dynamically.
Popular Webflow CMS Automation Workflows:
✅ Google Sheets → Webflow CMS (Auto-update CMS items when a new row is added).
✅ Instagram → Webflow CMS (Automatically add Instagram posts as CMS posts).
✅ Airtable → Webflow CMS (Sync structured data from Airtable into Webflow).
💡 Paddle Insight: Paddle Creative helped build the official Webflow App - Power Importer, which connects Airtable and Webflow for seamless content syncing at scale.
2. Webflow API for Advanced Automation

For developers, Webflow’s CMS API allows you to:
- Create, update, and delete CMS items programmatically.
- Sync Webflow CMS with external databases.
- Auto-generate new pages based on data from an external source (e.g., product inventory updates).
💡 Paddle Insight: If you’re managing large-scale content, an API connection can save hours of manual work while ensuring content consistency across platforms.
7. Performance Optimisation for CMS Collections
Webflow CMS is powerful, but large-scale content can slow down your site if not optimised properly. Here’s how to keep your site fast and responsive.
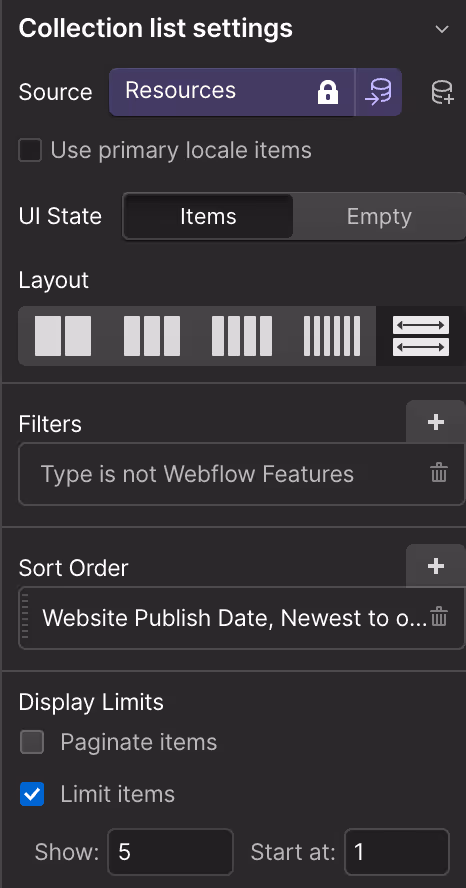
1. Limit the Number of CMS Items Displayed
Displaying hundreds of CMS items on one page can cause performance issues. Instead:
- Use pagination to break content into smaller chunks.
- Lazy load images to reduce initial page load time.
- Limit related items (e.g., showing only 3-6 related blog posts instead of all).
2. Optimise Images for Webflow CMS
High-resolution images can slow down your site, so always:
✅ Use WebP/Avif format (smaller and faster than PNG/JPG). & Webflow does it for you with the click of a button.
✅ Enable lazy loading for CMS images.
✅ Resize images before uploading (avoid super high resolutions unless needed).
3. Minimise CMS Fields & Unused Collections
Too many fields in a CMS Collection can affect performance.
- Remove unused fields that aren’t necessary.
- Keep content structured but not overloaded with unnecessary data.
4. Monitor Site Performance Regularly
Use tools like:
- Google PageSpeed Insights – To check load times.
- Webflow’s built-in performance metrics – To analyse rendering speed.
- Chrome DevTools – To track excessive requests from large CMS collections.
💡 Paddle Insight: If your site is slowing down, check Collection List settings and reduce the number of dynamic elements loading at once.
8. SEO Best Practices for Webflow CMS
To ensure your Webflow CMS content ranks well in search engines, a proper SEO setup is crucial. Read how to build an SEO-Friendly Blog in Webflow here.
Here’s how to optimise your CMS Collections for SEO:
1. Set Up Dynamic Meta Titles & Descriptions
Instead of manually writing meta descriptions for every page, Webflow allows dynamic SEO fields.
How to Set Up Dynamic Meta Tags:
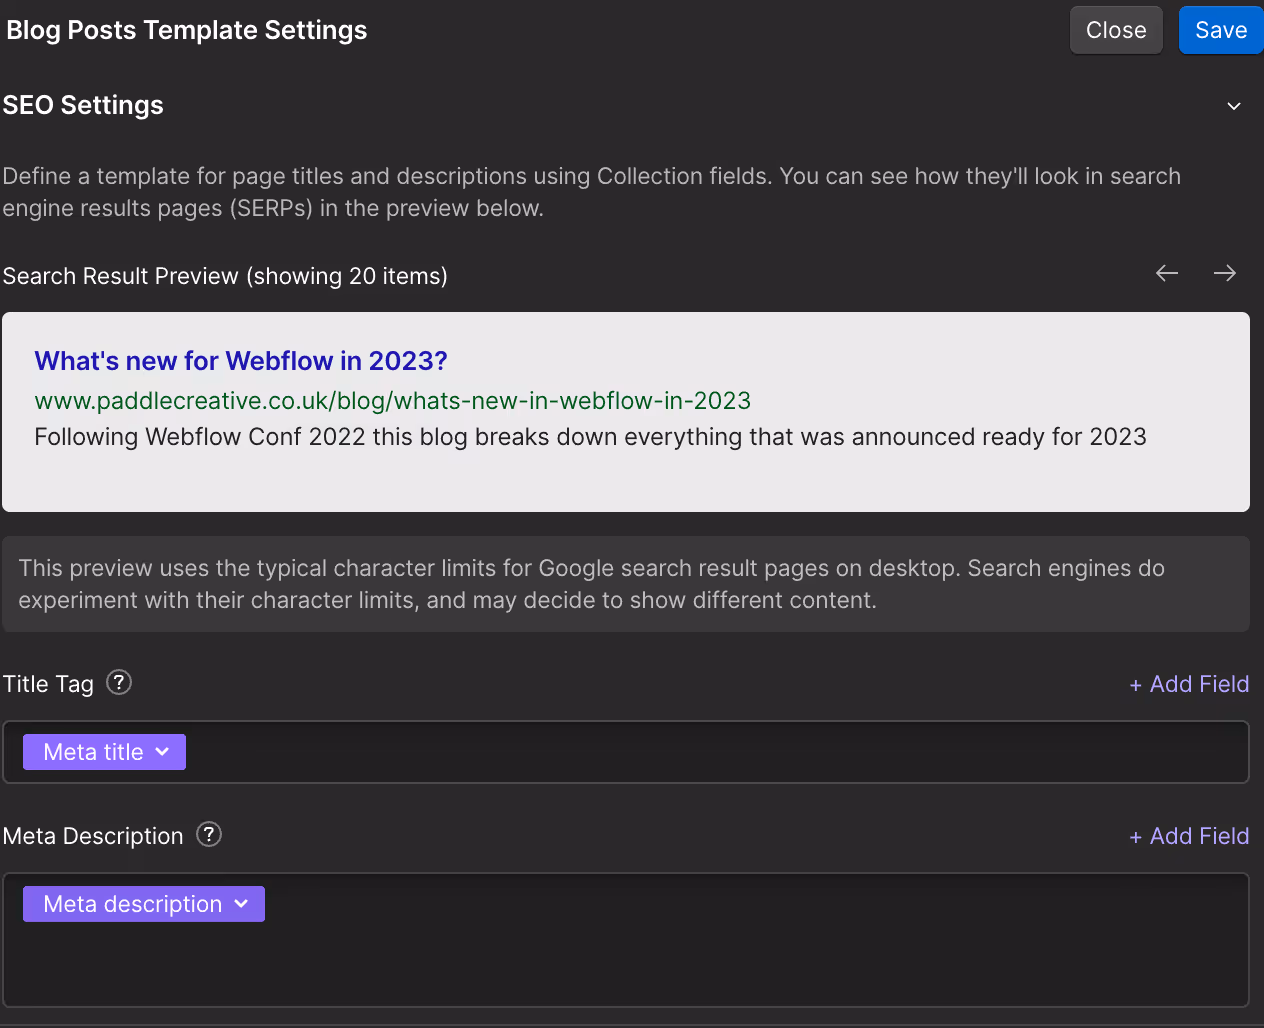
- Open CMS Collection Settings.
- Under SEO Settings, use CMS fields for dynamic meta titles and descriptions.
- Example:
Meta Title: {Post Title} | Your Website Name
Meta Description: Read about {Post Title} and discover insights on {Category}.
- Example:
💡 Paddle Insight: Keep meta descriptions within 155 characters for optimal search visibility.
2. Optimise CMS Collection URLS
- Keep URLS short, clean, and keyword-rich (avoid long, unnecessary slugs).
- Use dashes (-) instead of underscores (_) for better readability.
- Example:
- ❌ /blog/this-is-a-very-long-url-with-too-many-words/
- ✅ /blog/webflow-cms-guide/
3. Enable Open Graph & Schema Markup
To boost visibility on social media and Google, set up:
- Open Graph (OG) settings → Controls how your pages appear when shared on Facebook, Twitter, and LinkedIn.
- Schema markup → Helps Google and AI search models understand your content better (e.g., marking blog posts as "Articles" using JSON-LD).
4. Internal Linking for CMS Pages
Strong internal linking improves SEO and keeps users engaged.
- Link related blog posts within articles.
- Create a category structure that connects similar CMS pages.
- Use breadcrumbs to enhance navigation.
5. Webflow’s Auto-Generated Sitemap
Webflow automatically generates an XML sitemap for CMS content, but:
- Always check the sitemap in Google Search Console for any errors.
- Exclude irrelevant CMS pages, such as admin-only pages, from indexing using robots.txt.
Read Paddle Creative’s Complete Guide to SEO and website optimisation here.
9. Managing and Scaling CMS Content Over Time
Once your Webflow CMS is set up and optimised, the key to long-term success is maintaining clean, structured, and scalable content. Here’s how to manage your CMS efficiently over time.
1. Best Practices for Updating CMS Content
- Regularly review and update outdated blog posts, case studies, and product details.
- Automate content scheduling by adding a "Publish Date" field and using conditional visibility to display only live content.
- Archive old or irrelevant content instead of deleting it to maintain SEO value.
💡 Paddle Insight: Use Webflow’s Editor mode to let non-technical team members update content easily without touching the design.
2. Version Control & Backups
- Webflow automatically saves backups, but it’s a good practice to duplicate key CMS Collections before major updates manually.
- Keep a spreadsheet of essential CMS content, such as blog posts or case studies, as a backup in case of accidental deletions.
3. Handling CMS Limits in Webflow
Webflow has certain CMS limits based on your plan:
- 10,000 CMS items max (Business plan).
- 5,000 references per site.
- 50 CMS Collections per site.
Workarounds for CMS Limits:
- Use Webflow API to push content dynamically from an external database.
- Break content into multiple sites if necessary (use subdomains for different categories).
- Store rarely updated content in static pages instead of CMS items.
By keeping your CMS structured and organised, you’ll avoid bottlenecks and ensure smooth scaling.
Read about the best website builder for SEO here
10. Common Mistakes to Avoid
Even experienced Webflow users make mistakes when setting up CMS Collections. Here are some pitfalls to watch out for:
1. Overcomplicating Collection Structures
- Too many nested reference fields can slow down performance.
- If a simple text field will work, avoid unnecessary reference fields.
- Keep CMS fields minimal and only add what's necessary.
2. Ignoring SEO & URL Structure
- Avoid using long, unreadable slugs (e.g., /blog-posts-123).
- Always set up meta descriptions dynamically using CMS fields.
- Don't forget to redirect old URLs when changing CMS structures.
3. Using Too Many CMS Items on One Page
- If your site loads slowly, check if too many CMS items are displayed at the same time.
- Use pagination to break large lists into smaller, more manageable pages.
- Apply filters to show only the most relevant content.
4. Forgetting to Test on Mobile & Different Viewports
- CMS content may look great on desktop but break on mobile if not tested.
- Always preview dynamic CMS pages across multiple devices before publishing.
Avoiding these common mistakes will save you time, effort, and performance issues down the road.
11. Conclusion
Setting up Webflow CMS Collections the right way transforms content management from a tedious task into an automated, scalable process.
Key Takeaways:
✅ Plan CMS Collections carefully before creating them.
✅ Use Reference & Multi-Reference fields to structure content relationships.
✅ Automate updates using Webflow Logic, Zapier, or the Webflow API.
✅ Optimise performance by limiting CMS items per page and lazy-loading assets.
✅ Follow SEO best practices to ensure your CMS pages rank well.
With a well-structured Webflow CMS, you’ll have a future-proof content system that’s easy to scale and manage.
Author
Fact Checked By
.jpg)


.jpg)


%20(1).jpg)
%20(2).jpg)

%20(1).jpg)
.jpg)
.jpg)
%20(1).jpg)
.jpg)

.jpg)
.jpg)
.jpg)
.jpg)
.jpg)
%20(1).jpg)
.jpg)
%20(1).jpg)

%20(1).jpg)

.jpg)

%20(1).jpg)
%20(1).jpg)
%20(1).avif)


%20(2).avif)
.avif)


.avif)

.avif)
.avif)
.avif)
.avif)
.avif)
.avif)
.avif)
%2520(1).avif)
%2520(1).avif)
.avif)
%2520(1).avif)
%2520(1).avif)
%2520(1).avif)
%2520(1).avif)
%2520(1).avif)
%2520(1).avif)
.avif)
.avif)


